I had a brain storm for Mother's Day. I am the worst person in the world to remember dates and sending cards. I however, love to make hand made gifts. I seem never to find what I want to give or if I do I alter what they say and look like. How many of you have been in this spot? I love Pinterest, I call it my personal brain fart notebook. I hate trying to remember where I saw the last good idea that I can make. My computer was getting bogged down with "my favorites" and before you knew it was so out of control that I would role my eyes when I had to scroll through it to find what I wanted.
My brain storm was, "wow I would love to have a picture of all my kid's hand prints." Now my girls are 22, 14, 9, 1 1/2. I was only successful in getting one baby foot impression out of all my kids. Yes, I have great ideas but then procrastinate in doing the project, as my husband will say. So off to Michael's I went and to my luck there was a sale on canvases 2 for $4. Wow can't beat that. But wait I only need one. Well then I thought what about my mom, mother-in-law and step-mom. My kids are not theirs but I am and I know they would love this and too it was coming from me and my husband so that counts as a Mother's Day gift. LOL
I will post step-by-step of the Sunflower hand prints.
- This is what I started with. A blank Gessoed canvas. It is very important that the canvas is Gessoed, as it keeps the surface semi smooth and your acrylic or oil from bleeding into the material. Don't worry if you are saying "what", your canvas should state that it has been primed with Gesso.

- I bought acrylic paint 4 for $2. (I hit the jack pot), I just kind of sat on the floor in the isle and put together all the yellow paint to get four different shades that would help me get the visual effect I was looking for.
- I used a pie pan I had because it was big enough to put all the paint in. Now i started out with all of the girls putting their hand flat in the pan and then putting them on the canvas. Found out later that was not the affect I wanted, so I switched things up and started to paint the fingers to get the finger prints I wanted to make the petals. I liked this better, left the center clear to paint the center of the flower. I did not paint the thumb.

- I estimated how big to make the sunflower, so that called for a bigger canvas, (you may not need one so big if you have less than four kids). DON'T FORGET to paint a stem on your canvas. I did forget on my first flower, but that turned out ok. I painted the stem and estimated where I was going to put the hand prints. Now you want to paint the fingers and place them on the canvas in a repeated circle. You can over lap them. I DID NOT PAINT THE THUMB. Over lapping I think made it look fuller. (I started with a dark color first and then worked to the lighter color and then reversed the colors on the other canvases. I liked both ways. LET THE PAINT DRY BETWEEN APPLICATIONS OR USE A HAIR DYER, BETTER THAN THAT GO OUTSIDE AND ENJOY THE WEATHER).

- Now the second child do the same and estimate just 3/4 or more down the petals of the first child and repeat pattern around. YOU MAY HAVE TO GUIDE THE YOUNGER ONES.

- Now to the third child and repeat step #5.
- Now you are looking at this and thinking, "what! this is a mess", trust me it gets better. Now with a brown paint you want to use your finger and dip and dot the middle of the sunflower to get that sunflower look.
- Now at this point I thought "Ewww I'm not liking this". I added a little lady bug and had my girls figure out where to put it and used their fingers in red paint and made a dot. Woo Hoo.
 LET THE PAINT DRY AND TAKE A BLACK CRAFT MARKER TO ADD DETAIL TO THE LADY BUG. cute cute cute
- At this point you may like the way it looks and that is great, but being an artist, I felt the flower needed more depth. I got out my black acrylic paint, watercolor pencils and my paint brushes. I started with stippling black paint in the middle of the flower on top of the brown to give it the sunflower seed look.
- Next I took my watercolor pencils and used a reddish brown and black to shadow around the outer edge of the center of the sunflower. Then took my other colors and tried to match a shade darker on all the petals. I then started out lining the petals and putting some color between the front petal and petal behind it to give it some depth.
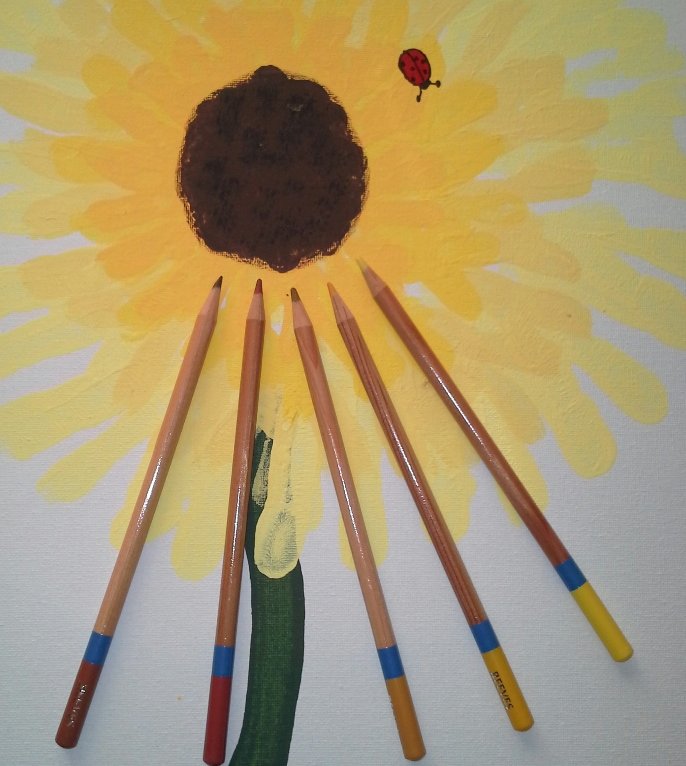
- After getting everything out lined and colored, I took a little bit of water and wet the brush, patted semi-dry and started spreading the watercolor pencil marks. At first when you get started the color seems dark but it dries lighter. If you step back and take a look you will see where you need to add and take away. You can also use a paper towel to blot if you need to.
- Now I'm done with the flower and I wanted to add the lyrics of the song "You Are My Sunshine" to the borders of the picture. I then found a font I liked on my Microsoft Word and sized the type as I wanted it and printed it out. I unfortunately did not have any carbon paper, so I used a graphite pencil or you can use an ordinary pencil, to shade the reverse side of the printed strips so it could act like carbon paper to trace on the frame. I will say I wish I had carbon paper.
- I taped the pieces of paper back to the frame and took a blunt tool or embossing tool to trace the words around the frame. Once that was completed, TADA, it was transferred and I used a fine tip craft marker to trace the words to make it permanent.


- Now you pretty much are finished with this. You can paint the outer part of the frame on the canvas or leave it white. I put a little personal touch on mine by putting my daughters initials or names on the petals that were their finger prints so my mom, step-mom and mother-in-law new what print where who's.


Now looking on Pinterest I saw another cute thing to do. This will be a neat God Mother gift with a little poem on a canvas.

Hope you liked this. Happy painting and crafting and Mother's Day to you all. I'm enclosing a video from Youtube on blending your watercolor pencils.--------> Sunflower Mother's Day project


 it is pretty handy. You warm it up in the microwave and pour it into you ready warmed fondue warmer. Neat thing is that this package has a nozzle on it you can recap and save again for later so you only need to put out what your going to eat. Well as self centered as I become when it comes to chocolate (I have hidy holes everywhere) I will warm it up and quickly make a journey to the garage or bathroom and drink it right out of the packet. LOL Pretty sad, huh!